A while back I offered my services on this forum.

tauruck

Sealiner
Step 43.

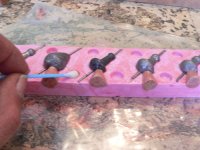
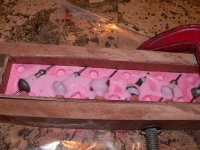
                Once the clay was removed it was time to dislodge the box. A paint scraper is the tool for this. Gently push it in between the new rubber and the box and then run it all along each side. Push the mould down at one end and she should slide out with a little help. Once you have the mold out you can pull all the mold keys out and you'll end up with your first half. Try and keep the thing on a level surface so that you don't dislodge the part being molded.
 

Attachments

  • mt43.JPG
    mt43.JPG
    36.6 KB · Views: 575

tauruck

Sealiner
Step 44.

           Clean up. Time to clean the project for doing the second half. Warm water mixed with a drop or two of green dishwashing liquid.  Soak a sponge in the solution and squeeze out. Gently go over the whole mold and if the clay spyue hole pieces fall out don't worry. You are going to make new ones anyway. Attention to detail is key.
 

Attachments

  • mt44.JPG
    mt44.JPG
    326.7 KB · Views: 591

tauruck

Sealiner
In most cases you could have left the mould half in the box but this "Battery" of sinkers was a little tight so I opted to break the box.
 

tauruck

Sealiner
Step 45.

               New sprue hole dummies. Roll some clay between your hands or nuke it in the microwave to get it really soft. Make you conical shapes and fit each one into the original half rounds. Takes work shaping etc but you did on the original setup. Trim the edges.
 

Attachments

  • mt46.JPG
    mt46.JPG
    205.9 KB · Views: 587

tauruck

Sealiner
Here's what your female mold should look like, ready for the final pour. It's the female because it has the indented side for the new mold key/locator. Tomorrow we finish this sucker.
 

Attachments

  • mt47.JPG
    mt47.JPG
    320.1 KB · Views: 580

killy

New member
excellent post .can this same principle be used to make grapnel sinker  moulds and moulds of trophy fish caught?
 

tauruck

Sealiner
Guys, I took this on when the workshop was quiet. Sorry, I'm trying my best to get to it. Before the weekend is over, I promise. You okes are worse than my customers, LOL.
 

khan

Senior Member
tauruck wrote:
Guys, I took this on when the workshop was quiet. Sorry, I'm trying my best to get to it. Before the weekend is over, I promise. You okes are worse than my customers, LOL.

Thanks for the secrets,

and i am glad that your workshop is busy again shows that there is hope for us after all.
 

tauruck

Sealiner
Step 48.

                  Building a new box or moving the original. I like building a new one around the first mould half. Make it the same height as the original. That way you will use the same amount of material as before and you won't be running around the house looking for all sorts of junk to mold with the excess RTV you've activated. I build the "L" shapes first. You need to get a good layer of Vaseline around the perimeter of the first mould. It is a sealer first and a releaser second. You box may not seal properly and the Vaseline just takes up the slack. This prevents the rubber getting between the box wall and the first mold.
 

Attachments

  • mt48.JPG
    mt48.JPG
    202.7 KB · Views: 491

tauruck

Sealiner
Step 49.

                 The Release agent (Vaseline) needs to be applied. Give a good coat all over. Use your finger, a brush or an earbud. Don't miss any areas. Whipe the excess away from the sample being molded. Remember that Silicone only sticks to other Silicone. The detail you want on the finished product will determine how much cleaning away of the excess release you need to do.
 

Attachments

  • mt49.JPG
    mt49.JPG
    118.2 KB · Views: 485

tauruck

Sealiner
Step 50.

                Build the box around your original mold. I used some wood glue, some thick wood strips and two clamps to hold the masonite box together. I only used the masonite because it was here. You will probably use thicker, better material for your box and you can use elastic bands, rings cut from tyre tubes etc to hold your box together. As long as the area between the box and the mould are sealed with the Vaseline you will be fine, Whipe the excess (ooze) away between the box sides and mold.
 

Attachments

  • mt50.JPG
    mt50.JPG
    183.9 KB · Views: 480

tauruck

Sealiner
Step 51.

                   Time to pour your final mold. Mix the Silicone as before and pour a little over the part being done. This just allows the bubbles to burst and gives a thin coating on the surface that prevents further bubbles forming. Once you have popped the bubbles or they have burst on their own you can now fill the box with the rest of the Silicone. Best done fron one end or corner of the box.
 

Attachments

  • mt51.JPG
    mt51.JPG
    175 KB · Views: 468

tauruck

Sealiner
Step 52.

             Fill the box and give it a few sharp raps against the work surface. This levels the silicone and helps get rid of those nasty bubbles. I do this every 15 minutes for about 45 minutes (3 times). Leave it to stand for 2 hours before post curing. Tomorrow morning we open the mould.
 

Attachments

  • mt 52.JPG
    mt 52.JPG
    197.6 KB · Views: 463
Top