You are using an out of date browser. It may not display this or other websites correctly.
You should upgrade or use an alternative browser.
You should upgrade or use an alternative browser.
A while back I offered my services on this forum.
- Thread starter tauruck
- Start date


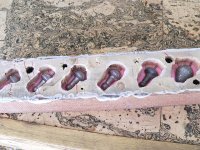
Step 30.
You should now have all your sprue hole setups done. Time to go over your work carefully and check that you havent missed anything. This is also a good time to check that the black plastic pieces are in as near an upright position as possible. They can protrude from the board anywhere from 3 to 8mm. In the case of a bead or bearing you only want half of it's diameter above the board. In the next segment in a day or two we'll build the box, do the release and sealing. Finally we'll pour the actual Silicone.
You should now have all your sprue hole setups done. Time to go over your work carefully and check that you havent missed anything. This is also a good time to check that the black plastic pieces are in as near an upright position as possible. They can protrude from the board anywhere from 3 to 8mm. In the case of a bead or bearing you only want half of it's diameter above the board. In the next segment in a day or two we'll build the box, do the release and sealing. Finally we'll pour the actual Silicone.
Attachments
Mazdadrifter
New member
Thanks Mikey this is a lot of work and I apreciate it very much. Mana, mana, mana, mana and some more mana to you.
Part 3. I've lost track but here's the next installment.
You have to make a box to fit around your board. You can use any material om this. Cardboard, wood or plastic. Cut your 4 sections to length and width. Give a generous width if you intend using the mold for white metal (Lead). 15mm above the highest point of the part being molded should do it.
You have to make a box to fit around your board. You can use any material om this. Cardboard, wood or plastic. Cut your 4 sections to length and width. Give a generous width if you intend using the mold for white metal (Lead). 15mm above the highest point of the part being molded should do it.
Attachments

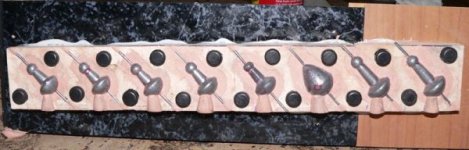
Step 33.
Once the two ends are bonded it's time to add the sides. If you intend going the Vaseline route you can use elastic bands to hold the four sections of the box together. Depending on size you can use bicycle or car tyre tube sections for the same effect. I used adhesive so the sections are lightly clamped for 2 hours.
Once the two ends are bonded it's time to add the sides. If you intend going the Vaseline route you can use elastic bands to hold the four sections of the box together. Depending on size you can use bicycle or car tyre tube sections for the same effect. I used adhesive so the sections are lightly clamped for 2 hours.
Attachments

Step 36.
You have a box, now you need to put a release agent on everything. Not neccessary at all but I used Balsa as my base and it's a porous substance so in this instance I advocate the use of PVA release agent. Available from Glassfibre suppliers. It dries to a micron thin layer and seals off the porosity 99%. for anyone else this step is not essential. Silicone only adheres to other Silicone.
You have a box, now you need to put a release agent on everything. Not neccessary at all but I used Balsa as my base and it's a porous substance so in this instance I advocate the use of PVA release agent. Available from Glassfibre suppliers. It dries to a micron thin layer and seals off the porosity 99%. for anyone else this step is not essential. Silicone only adheres to other Silicone.
Attachments


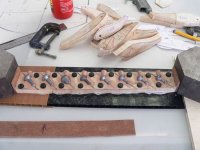
Step 38.
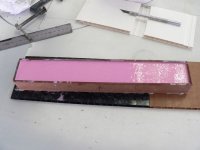
The most important section. Mixing the RTV (Silicone) and hardener. If you don't have an electronic scale run a piece of masking tape up each side of the two containers. Mark the top of where the liquid sits in both instances. Divide the distance into four segments ie 100mm total, mark at 25, 50 and 75mm. The same on both containers. Now you have a fairly accurate way of measuring equal amounts of the two materials. The system in use here has a mix ratio of 10:1. 1Kg Rubber to 100gr of hardener, Get the Silicone into a container and add the hardener. Use a paint scraper, spatula or piece of wood to fully mix the solution. The colour of this mix is the most "GAY" colour I have seen yet but we have to live with it. Mixing is tough but you have to do it right. I like 15 minutes including scraping the sides of the container so that if you let the material run off the spatula it is of a UNIFORM colour. No cream and white marble effect. Get this right and don't panic. You have TIME!!.
The most important section. Mixing the RTV (Silicone) and hardener. If you don't have an electronic scale run a piece of masking tape up each side of the two containers. Mark the top of where the liquid sits in both instances. Divide the distance into four segments ie 100mm total, mark at 25, 50 and 75mm. The same on both containers. Now you have a fairly accurate way of measuring equal amounts of the two materials. The system in use here has a mix ratio of 10:1. 1Kg Rubber to 100gr of hardener, Get the Silicone into a container and add the hardener. Use a paint scraper, spatula or piece of wood to fully mix the solution. The colour of this mix is the most "GAY" colour I have seen yet but we have to live with it. Mixing is tough but you have to do it right. I like 15 minutes including scraping the sides of the container so that if you let the material run off the spatula it is of a UNIFORM colour. No cream and white marble effect. Get this right and don't panic. You have TIME!!.
Attachments

Step 39.
I like to use the mixing tool (Spatula) to dribble some RTV over the part/s being molded. It forms a skin over the part before you start filling the box. As it settles you will notice bubbles forming on the suface. I pop these with a needle for two reasons. I smaak it and you get rid of them for a void free surface later. This RTV is not like resin you might have used before and it won't cure in the container before you use it. You may be fooled into thinking there's a problem with it and it's not curing. Leave it alone. This stuff is designed to cure super slowly and to let the bubbles of air escape.
I like to use the mixing tool (Spatula) to dribble some RTV over the part/s being molded. It forms a skin over the part before you start filling the box. As it settles you will notice bubbles forming on the suface. I pop these with a needle for two reasons. I smaak it and you get rid of them for a void free surface later. This RTV is not like resin you might have used before and it won't cure in the container before you use it. You may be fooled into thinking there's a problem with it and it's not curing. Leave it alone. This stuff is designed to cure super slowly and to let the bubbles of air escape.
Attachments


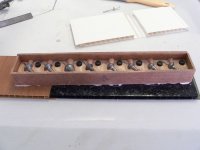
Step 41.
The box has been filled. All that's needed is to rap it against the table a few times, maybe every five minutes over an hour. You'll see the bubbles popping on the suface. The box should be left somewhere warm. Room temp or above. This material needs to be post cured but we will cover that in the last segment tomorrow. Just leave the mold and let the chemical process take it's course. 24 hours should see it ready for the final step.
The box has been filled. All that's needed is to rap it against the table a few times, maybe every five minutes over an hour. You'll see the bubbles popping on the suface. The box should be left somewhere warm. Room temp or above. This material needs to be post cured but we will cover that in the last segment tomorrow. Just leave the mold and let the chemical process take it's course. 24 hours should see it ready for the final step.
Attachments
Just a quickie. RTV (Silicone) picks up the finest detail imaginable. The feet in picture were cast in an RTV mould. The resin used was a Polyester mixed with fillers and the end result was a pair of feet that have a very dead look to them. The colour, not intended came out like this. These things have given us more fun here than you can imagine. Countless maids have run screaming from the pub area because there were a pair of dead feet protruding below the curtain and there was no one connected to them. A wannabee Big drinker was sent to the pub to fetch the pellet gun which was next to DA Feet. He came back without the gun but as white as a sheet. They were buried at the fence toes up and it wasn't long before the local "Busy Body" Janet the old hag called the Police to inform them that she thought I had murdered my missus because the dogs were sniffing a body that was protruding from the sand. Bye Janet!! You idiot. The material is good at fooling fish too. The spots are paint. Certain people don't want to touch dead stuff when painting.
Attachments

Polychaete
Senior Member
Thanks for a very informative post. I have worked with this material in the past, but found mouldmax not entirely suitable for pouring hot metal. You can do it, but the mould deteriorates quickly and seems to distort quite soon as well.
I understand you get heat resistant silicone which is expensive, but longer lasting when used to pour molten tin.
I plan to make a spoon mould from silicone shortly.
I understand you get heat resistant silicone which is expensive, but longer lasting when used to pour molten tin.
I plan to make a spoon mould from silicone shortly.

Polychaete wrote:
There are different grades of Mould Max. This is the highly heat resistant material. 200 degrees plus. You need to sprinkle Graphite powder on all RTV moulds before pouring metal. Prolongs life. Also if you make the mould too thin or you haven't post cured it you might run into the problems you had. Buy the Max 30 I used here and get the Graphite powder. AMT Composites in your area. Any problems, PM.Thanks for a very informative post. I have worked with this material in the past, but found mouldmax not entirely suitable for pouring hot metal. You can do it, but the mould deteriorates quickly and seems to distort quite soon as well.
I understand you get heat resistant silicone which is expensive, but longer lasting when used to pour molten tin.
I plan to make a spoon mould from silicone shortly.
Step 42.
The rubber has cured. According to the manufacturer the material should be post cured. This means elevated temperature. I would suggest leaving it near a household heater overnight or if you don't have access to one just wrap the job in either black plastic garbage bag or Aluminium foil. Put this where it will get good sun, maybe on the window sill. If you aren't sure about the curing I'd leave it for 2 days. Time to demold. I flipped the job over after I made sure it was properly cured. A pin pushed into it but away from critical areas should tell you but the finger test works too. It should be frm and not leave thumb prints. I peeled out the clay in one area and once I established the rubber was cured I did the others.
The rubber has cured. According to the manufacturer the material should be post cured. This means elevated temperature. I would suggest leaving it near a household heater overnight or if you don't have access to one just wrap the job in either black plastic garbage bag or Aluminium foil. Put this where it will get good sun, maybe on the window sill. If you aren't sure about the curing I'd leave it for 2 days. Time to demold. I flipped the job over after I made sure it was properly cured. A pin pushed into it but away from critical areas should tell you but the finger test works too. It should be frm and not leave thumb prints. I peeled out the clay in one area and once I established the rubber was cured I did the others.