You are using an out of date browser. It may not display this or other websites correctly.
You should upgrade or use an alternative browser.
You should upgrade or use an alternative browser.
A while back I offered my services on this forum.
- Thread starter tauruck
- Start date
 :first
Andre Laas
Sealiner
Great Stuff Man!!!
Amped to see part 2... I have some silicone from AMT waiting to be used!!!
Amped to see part 2... I have some silicone from AMT waiting to be used!!!
Mazdadrifter
New member
Thanks for this info Tauruck. Manna to you.
tauruck wrote:

Probably in a week or so.
Watch this space, for thenext exciting episode of: "HOW DOES HE DO IT??"In part 2 of the tutorial I'll show you how to insert mould "Keys", build the box, prep the whole surface for release and finally how to pour both sides of the new mould with the pouring runners in place. If you think I missed something or have any questions don't hesitate.
Part 2 will be posted in a week or so. Thanks fof allowing me this opportunity to share what I do everyday when I absolutely have to. Thanks to the mods (Homie) and Pieter Meintjies aka MazdaDrifter.
Probably in a week or so.
AndriesH wrote:
Thanks Andries. Good one. "He does it with great difficulty"tauruck wrote:Watch this space, for thenext exciting episode of: "HOW DOES HE DO IT??"In part 2 of the tutorial I'll show you how to insert mould "Keys", build the box, prep the whole surface for release and finally how to pour both sides of the new mould with the pouring runners in place. If you think I missed something or have any questions don't hesitate.
Part 2 will be posted in a week or so. Thanks fof allowing me this opportunity to share what I do everyday when I absolutely have to. Thanks to the mods (Homie) and Pieter Meintjies aka MazdaDrifter.
Probably in a week or so.
sardinella
Senior Member
Once again a super post on Sealine.
Thanks T
Thanks T
ThefishinMagician
Sealiner
tauruck wrote:
Nice Work Mikey !
How can you leave a person hanging... it was just getting interesting....In part 2 of the tutorial I'll show you how to insert mould "Keys", build the box, prep the whole surface for release and finally how to pour both sides of the new mould with the pouring runners in place. If you think I missed something or have any questions don't hesitate.
Part 2 will be posted in a week or so. Thanks fof allowing me this opportunity to share what I do everyday when I absolutely have to. Thanks to the mods (Homie) and Pieter Meintjies aka MazdaDrifter.
Nice Work Mikey !
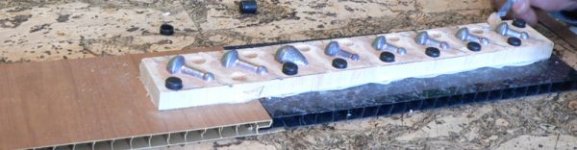
Part 2. Sorry guys, this is taking a little longer than expected. I had hoped to complete this today but had an emergency repair to do. We left off where the sinkers were all imbedded in the clay. This segment covers the mold keys (locators) and the sprue holes or down gates. Some of the pics are a little blurry for some reason and I had gone too far before I realized there was a problem.


Step 22.
Pilot holes drilled. Now you have to find sutable material to use as mold keys. 10 or 12mm plastic beads from an old necklace or ball bearings are best. I found these plastic bits in the workshop. Not sure what they are but will do the job. These measured 12mm.
Pilot holes drilled. Now you have to find sutable material to use as mold keys. 10 or 12mm plastic beads from an old necklace or ball bearings are best. I found these plastic bits in the workshop. Not sure what they are but will do the job. These measured 12mm.
Attachments


Step 25.
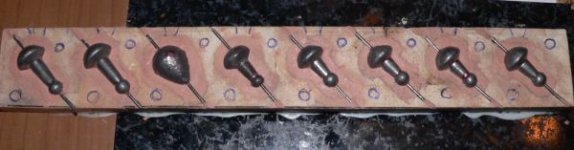
Offer the cylindrical clay up to the sinker. Try match the small end to the part of the sinker where the excess was originally trimmed. Work the clay into the board and try create a good seal. Keep it so that the widest part of the clay is at the place where it meets the board.
Offer the cylindrical clay up to the sinker. Try match the small end to the part of the sinker where the excess was originally trimmed. Work the clay into the board and try create a good seal. Keep it so that the widest part of the clay is at the place where it meets the board.