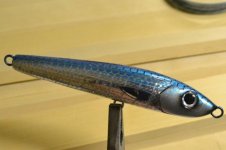
How to make a wood split body fishing lure. As pr

Fishing Meister wrote:
awesome stuff bennie. must be really cool to catch a fishy on a lure you made yourself ::S

Gonna definitely have to try this. Eish - The wire work. You make it look so easy but me thinks mine will not quite look like that ?:fbash

How about showing us the air brushing equipment and a simple how to for those of us who have not done airbrushing before.

Also once you have waterproofed the lure, i assume you test it before painting. If you test it and then alter something, do you just sand down and re-waterproof it
Cool, the fish don't really care how nice it looks... I feel that good looking lures do catch more fish but only because we tend to use them more. So if the wire form isn't pretty - don't stress, it comes with practice. Besides the fish don't care.

For the most part, I have made very similar lures so I'm fortunate in that I have a good idea what works here. But yes, you can test swim it, drill more holes and add weight, drill some weight out, sand the shoulders down a bit +++. Then just sand smooth and seal it again. You don't even need to seal it. test it till you are happy, then to get all the moisture out, bake it in the oven till dry before sealing it. A good tip is to chuck it in the sealer while hot still for better penetration.
 
OK. So now we are going to the next step. What I'm going to use is some netting to get a pattern across the back. Just for reference, I'm using different nets and trying to size the net to the bait size.

1 - Our project lure. For this one I have used a very fine mesh which I got from a fabric shop. Pull it around the lure and use some paper clips to keep it tight and in place.

DSC_0562-1.jpg


2 - This is a larger nett that I cut from a washing bag.

DSC_0563-1.jpg


3 - This is a stencil. You can have any sign writer cut stencils for you.

DSC_0565-1.jpg
 
Next we go over it with silver. Make sure you set the air pressure very low and you keep the gun at 90 degrees to the work piece.

DSC_0567.jpg

DSC_0566.jpg
 
Then go over it with what ever colour you like. In my case - Blue!
DSC_0568.jpg


IMPORTANT: Remove the netting immediately and go over it lightly with a clear coat.


The results so far. Bear in mind the lures probably look incomplete. This is because they have no eyes yet. The eyes are very important in completing the lure.

DSC_0574.jpg

DSC_0575.jpg

DSC_0576.jpg
 
And here is something else you can do with stencils.

squid.jpg


I just want to point out that apart from this lure, the only colours I've used is Silver, White, Black and Blue. All standard off the shelf colours.
 

zulu-X-treme

Sealiner
Superb Bennie, really superb... Thanks for taking the time to post and explain everything and I think you have inspired a few of us to 'stuck in'... ::respekt:
 
I'm glad it is appreciated! Thanks for the positive comments.

I just want to clarify that I'm not an "expert", so I am also open to constructive crit! If you know of a better process, please let me know.
 

swarley81

New member
::tclaph

Great post Bennie, I've stumbled onto this part of Sealine a while ago and I've been following your posts almost religiously, wanting to build my own lures as well.

How did you make the eyes for the test lure? Did you just use the foil technique described in an earlier post?

Once again, thank you for sharing your knowledge!
 
swarley81 wrote:
::tclaph

Great post Bennie, I've stumbled onto this part of Sealine a while ago and I've been following your posts almost religiously, wanting to build my own lures as well.

How did you make the eyes for the test lure? Did you just use the foil technique described in an earlier post?

Once again, thank you for sharing your knowledge!
You are welcome!

You can buy eyes. Kings has a nice selection in stock. 3D eyes, realistic eyes and flat stick on eyes. But I make my own using vinyl cuttings and clear resin. I also use doming resin. The same stuff used to make 3d badges. But not really worth the initial investment imo. Rather just use the resin.

http://www.roland.co.za/Pages_Products/ultradome.htm
 
Making your own eyes. I always make my own eyes for a number of reasons but maily so mine are unique. Even if simple, they are different and it is one of the ways you can distinguish my lures.

The simplest way is to use clear PU resin. Mix it up and just drip it on your vinyl cut outs. But this is the method I have been using lately. It is a doming resin used for making badges and unfortunately the system will set you back probably R300 initially.

On the left is the applicator gun, in the middle the resin 2-parts and On the right is a mixer.
DSC_0586.jpg


Just get
some vinyl sections cut and lay them over each other.
DSC_0584.jpg

DSC_0585.jpg


Just drip some resin in the centre. Simple but don't over do it!!!
DSC_0588.jpg
 

Andre Laas

Sealiner
Bud, your stuff is amazing... .would have loved to see what you would produce if we had all the resins/pigments/materials/resources available that the builders in the USA has! Then again.... you are out-doing them with what we have got here!
 
Critter wrote:
Bud, your stuff is amazing... .would have loved to see what you would produce if we had all the resins/pigments/materials/resources available that the builders in the USA has! Then again.... you are out-doing them with what we have got here!
Not sure about out doing them but thanks for the compliment any way. I am at least getting to trade with some of those top builders, which is a great honour for me! I'll post some pics of my trades!
 
Top