How to make a wood split body fishing lure. As pr

Thank you. As long as someone can make use of this.

Right, I can't leave the bloody thing lying here on my desk... So I'm back at it.

WARNING: THIS IS ADDICTIVE! ONCE YOU START YOU WILL BE HOOKED FOR LIFE!!!

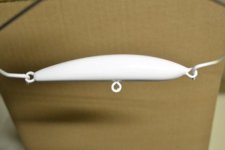
So I grabbed some 60# paper and started sanding away. The best is to sand a little on the left, a little on the right. The best way to make sure you are shaping both sides evenly is to eye ball but mainly by feel. If you rind your fingers over it, you will feel if the curves are even. Don't think it is anything like carving biltong. Only use a knife if you know what you are doing. Once you have the shape pretty decent, continue with 200# paper.

DSC_0520.jpg


You may battle to split the lure. Just run a blade between the 2 halves.

DSC_0522.jpg


DSC_0523.jpg
 
Ballast.

Lets just discuss the point of ballas. Look at the lure this way. To keep a piece of string vertical, you need a force pulling it up but you also need gravity pulling it down. In the same way, we use buoyancy (the wood floats) and we use ballast in the form of lead. The further apart these are the better the righting moment will be. If we use lead ballast in a lead body, it would make no difference to the lures righting ability. Now you can see why I like Jelutong. It is very buoyant. The down side is we now need a lot of lead to make it sink like I do with this lure. If we move that lead closer to the centre of the lure, we can make it roll a little, but too much and it will flip over.

I cannot give you a hard and fast answer here, only by replicating a lure over and over can you improve on it's design. It is very seldom that you will make a lure and it is perfect from the beginning. Another option is to keep the wire form away from the belly and drill into the body to add weight as and if you feel necessary.

A suggestion for nubes: Perhaps split your lead weight. half just in front of the belly hanger and the other half between the belly hanger and the tail. This can be used as a starting point and the lure may work quite fair, but only you will be able to figure it out.

OK, so first we need to "assemble" the lure. Hold it together with elastics and attach the rigging. Then simply add weight till it does what you want it to do. You can attach the lead with elastics or tape, what ever works for you. You need to do this in salt water if the lure is intended for the sea. The lure will be more buoyant in salt!!

DSC_0525.jpg


Adding lead. This is the simplest way to do it imo.

I used a 6mm drill bit to drill a number of holes into the belly while in the vice.
CopyofDSC_0526.jpg


Next I put the wire form back into the lure and with the use of an ordinary table spoon and a gas burner I melted a little lead and poured it into the holes. Some holes are deeper than others so I can adjust the balance. Once you've done this you can split it again.

CopyofDSC_0531.jpg
 
Now simply glue it together. Make sure you use a water proof glue. Ordinary wood glue will dissolve in water.
 

Attachments

  • DSC_0528.jpg
    DSC_0528.jpg
    30.3 KB · Views: 1,094
Glue is dry so I gave it a little sanding with 200# to clean the glue residue.

Ready for sealing.
 

Attachments

  • DSC_0533.jpg
    DSC_0533.jpg
    30.2 KB · Views: 1,082

Patrick

Sealiner
Good tutorial! Can i ask, do you bend your wire in a jig or just freehand? How do you get the loops so circular and keep the wire straight after all the bending? Also where do you get your 1.2 mm wire from? I'm only able to find 1.6 and up s/s welding rods.
 

Nepptune

Sealiner
Bennie - You sir are a true artist mate, unbelievable....

As much time and effort that gets put into a lure like this, taking the time to shoot pics and share in a thread, must take 5 times as much time and effort, and its massively appreciated!!
 
Patrick wrote:
Good tutorial! Can i ask, do you bend your wire in a jig or just freehand? How do you get the loops so circular and keep the wire straight after all the bending? Also where do you get your 1.2 mm wire from? I'm only able to find 1.6 and up s/s welding rods.
Hey Patrick,

It is all done free hand. BUT don't be fooled, it's not that difficult. The best tool I could find to do this is a pair of circlip pliers. I will do this step a little more in depth on Monday for you.

@ Nepptune, budy it takes 10 times as long especially with my photography skills. :? But I hope to pass my passion for lure building on to someone who will one day make great lures. Hopefully one day I will make great lures... who knows?
 

Patrick

Sealiner
benniejordaan wrote:
It is all done free hand. BUT don't be fooled, it's not that difficult. The best tool I could find to do this is a pair of circlip pliers. I will do this step a little more in depth on Monday for you.
Awesome, thanks. I'll go look for those pliers so long. About the wire, appreciate your offer. Dont want to take all your supplies so will phone a few welding shops 1st. if i dont come right then i'll take you up on your offer!
 

oomfaan

Senior Member
Patrick wrote:
benniejordaan wrote:
It is all done free hand. BUT don't be fooled, it's not that difficult. The best tool I could find to do this is a pair of circlip pliers. I will do this step a little more in depth on Monday for you.
Awesome, thanks. I'll go look for those pliers so long. About the wire, appreciate your offer. Dont want to take all your supplies so will phone a few welding shops 1st. if i dont come right then i'll take you up on your offer!
Patric, if you find some will you let me know where as well. Or we'll have to get a spool together.
 
Wire forms:

This is essential in getting the bait looking the part. Get this right and it makes the world of difference in making your bail look professional.

Some of the tools you need..
From left to right:

Small side cutters. I don't actually use these for cutting but rather bending in tight areas.

Split ring pliers: You also get round nose pliers but I an't find any. These are essentials. You need these to get a nice bend. However you can put a screw driver in a vice and work with it.

Mini bolt cutters: There is nothing better for cutting hard wire. They are not expensive either, I paid R28 for mine.

Pliers: For straightening and manipulating.
 

Attachments

  • DSC_0535.jpg
    DSC_0535.jpg
    45.4 KB · Views: 1,040
When you do your wire forms. Start in the centre. Do the belly hanger first. Use the round nose pliers to form a circle. Roll it so the 2 wire legs go past each other and finish up with an angle greater than 90 degrees.

DSC_0536.jpg


Now you can use the small side cutters to bend the legs back out. One at a time. Be careful you do not score or damage the wire form.

DSC_0538.jpg

DSC_0539.jpg


Using the pliers hold half the ring and twist the loop in line. Make sure you got is perfectly aligned before moving on.

DSC_0540.jpg


Lay the wire form with the belly hanger in the correct position. Using a black marker, mark where you want to do the bends that will lead to the tail and tow point then bend them straight, taking care to keep it in line.

DSC_0541.jpg


Mark the next bend with a black marker and basically follow the process.

DSC_0543.jpg

DSC_0544.jpg


Holding the loop tight with pliers, bend the leg 90 degrees, then wrap it around the main wire.

DSC_0546.jpg

DSC_0547.jpg


Repeat for the tail hanger.

DSC_0549.jpg
 
OK, Sealing your lure.

The best way to do this is to dilute a PU floor sealer. Mix it in a ratio of around 3:1 with thinners. Since I only paint with 2-k paints, I use 2-k thinners for this too. Submers it in this solution for a period of time, 30m -1 hour will do. Then hang it up to dry which will take a few days to dry properly.

Another option you could use if in a bit of a hurry like I am here, is to just use clear coat. I'll take a bit of clear coat, mix it 2:1 with hardener, pour it in a bag with the lure and slosh it around a bit. Not the best way but it will prevent water penetration. If you are a first time lure builder, this may be a good beginner solution for you.

Tomorrow we can discuss the paint process. Airbrushing!::S
 

Attachments

  • DSC_0534.jpg
    DSC_0534.jpg
    15.3 KB · Views: 1,030
Top