You are using an out of date browser. It may not display this or other websites correctly.
You should upgrade or use an alternative browser.
You should upgrade or use an alternative browser.
Transom replacement
- Thread starter cjcooper
- Start date


")

nice man. nice
dankie vir die update.
yip, proppe regmaak is n kuns.
lol
dankie vir die update.
yip, proppe regmaak is n kuns.
lol
Howzit guys,
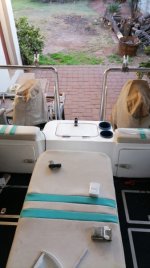
Been a while since my last update, covid and work Ive completed the replacement and all worked out well, here is some more pics of the boat which is about 98% complete.
Most of what we did since the last post includes:
- An entire electrical replacement.- Replaced the coffin hatch with a bigger one, now takes 6 cans.- Installed a proper false transom to house the batteries with a nifty livewell. I added 110mm luna tubes just in case- new carpets.-Rod rack.- Some cleaning up on the engines side of the false transom. tried something with creepy pipe....
Been a while since my last update, covid and work
Ive completed the replacement and all worked out well, here is some more pics of the boat which is about 98% complete.Most of what we did since the last post includes:
- An entire electrical replacement.- Replaced the coffin hatch with a bigger one, now takes 6 cans.- Installed a proper false transom to house the batteries with a nifty livewell. I added 110mm luna tubes just in case- new carpets.-Rod rack.- Some cleaning up on the engines side of the false transom. tried something with creepy pipe....