
You are using an out of date browser. It may not display this or other websites correctly.
You should upgrade or use an alternative browser.
You should upgrade or use an alternative browser.
Restoring an Acecraft 16 footer
- Thread starter pgreeff
- Start date
The rib along the keel is a wooden strip bow to stern. That is part of the original design. It's just the one pipe that needs to come out.
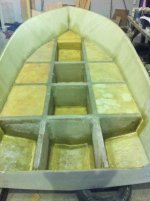
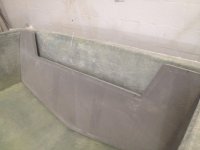
The original configuration was a forward console. I've already cut that out. The nose cone will get a hatch where the anchor will be located for convenient access.
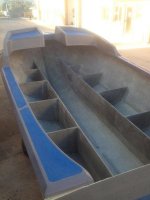
Quick question regarding a foamed deck, what is normally done with the drainage holes? I expect they're nicely clogged up by the foam so they're not of much use.
The original configuration was a forward console. I've already cut that out. The nose cone will get a hatch where the anchor will be located for convenient access.
Quick question regarding a foamed deck, what is normally done with the drainage holes? I expect they're nicely clogged up by the foam so they're not of much use.

pgreeff wrote:
Good question
I don't know
What if you put grease on a PVC pipe along the keel and pull it out after you have foamed?
The rib along the keel is a wooden strip bow to stern. That is part of the original design. It's just the one pipe that needs to come out.
The original configuration was a forward console. I've already cut that out. The nose cone will get a hatch where the anchor will be located for convenient access.
Quick question regarding a foamed deck, what is normally done with the drainage holes? I expect they're nicely clogged up by the foam so they're not of much use.
Good question
I don't know
What if you put grease on a PVC pipe along the keel and pull it out after you have foamed?
I'm in the process of preparing the new wood. I would appreciate some advice regarding gluing the new bulkheads and stringers in place. In a build video blog I followed the American used PO glue. Remarkably Google wasn't very helpful in finding the suggested bonding agent.
As I see it it needs to have gap filling properties, be water resistant and have some flexibility. I don't like the idea of the wood resting directly on the hull however some seem to just glass it in place with nothing but resin. Maybe that is the way to go.
Your thoughts would be appreciated.
As I see it it needs to have gap filling properties, be water resistant and have some flexibility. I don't like the idea of the wood resting directly on the hull however some seem to just glass it in place with nothing but resin. Maybe that is the way to go.
Your thoughts would be appreciated.
pgreeff wrote:
Consider my excitement diminished...
The coosa board is fascinating. I've sent a message to Coosa composites to find out more about this stuff.
I'm very excited about this material, however, I suspect my excitement will rapidly diminish as soon as I find out about the cost.
Consider my excitement diminished...
you have laminated / glassed before? know how to make fillets etc?
make a template for the bulkhead pieces, then u cut once, saves getting in and out all the time. then once cut you can rubber strip and sika all in place in one process.
Template with corex strips (estate agents board) / glue gun and cutting knife, with the strips you make a frame to fit shape, and then you can cut after. Much easier to do framework than make one whole piece fit.
Found if you do a methodical system was easier and less time consuming as you work with one set tool at a time. less changing / sticky hands etc.
you can coat the wood with resin, not the best, but my boat was 23 years old and waterlogged for many and some of the resin coated wood was still ok. I used CCA treated pine and gave it a coat with resin once fitted.
Enjoy
make a template for the bulkhead pieces, then u cut once, saves getting in and out all the time. then once cut you can rubber strip and sika all in place in one process.
Template with corex strips (estate agents board) / glue gun and cutting knife, with the strips you make a frame to fit shape, and then you can cut after. Much easier to do framework than make one whole piece fit.
Found if you do a methodical system was easier and less time consuming as you work with one set tool at a time. less changing / sticky hands etc.
you can coat the wood with resin, not the best, but my boat was 23 years old and waterlogged for many and some of the resin coated wood was still ok. I used CCA treated pine and gave it a coat with resin once fitted.
Enjoy
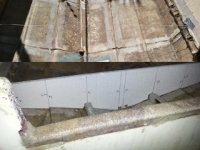
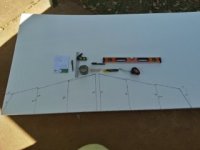
The template was made by stringing a taut line across the width at the height of the deck. With a square and tape measure the height at each change in hull pick was measured and then transferred to the template.
The templates were cut from polystyrene sheets. It works well, although the tolerance is not perfect as the sheet can deform under stress and is quite thick. your correx board recommendation is definitely more accurate. The wood was cut from the template and the little excess pieces trimmed with the jigsaw.
The templates were cut from polystyrene sheets. It works well, although the tolerance is not perfect as the sheet can deform under stress and is quite thick. your correx board recommendation is definitely more accurate. The wood was cut from the template and the little excess pieces trimmed with the jigsaw.
Attachments
will find the frame will be easier, corex you can cut with scissors round the bumps etc and being a strip is easily to handle and you do not have to measure as you fit to the shape. can use masking tape to add on small pieces / join
could use the template you made as as support while doing the frame, use drawing pins to secure corex while glue cools.
I would first level the hull. if the hull is level you can use a level to check the work.
Depends on how you are doing the structure, my butcat had a timber strip all round the edge where the deck goes rests on, if you are going to have frames and bulkheads, I would glass that in first, then lam in a few supports across port to starboard so that the shape does not move much and then make templates for the ply bulkheads for those positions.
could use the template you made as as support while doing the frame, use drawing pins to secure corex while glue cools.
I would first level the hull. if the hull is level you can use a level to check the work.
Depends on how you are doing the structure, my butcat had a timber strip all round the edge where the deck goes rests on, if you are going to have frames and bulkheads, I would glass that in first, then lam in a few supports across port to starboard so that the shape does not move much and then make templates for the ply bulkheads for those positions.