my crankbait/stickbait

chokka 123

New member
Here is my best attempt after a lot of trail and error this is my best DIY lure to date. I use a grinder to shape my wooden blanks and some acrylic paint and spray paint to paint with. I also used some molding rubber to add 3d gill plates and the small fin. IT weighs 7g and I would like to catch bass with it. I still need to clear coat it and need advice for that
 

Attachments

  • Phot.jpg
    Phot.jpg
    25.5 KB · Views: 212

Ben REINERS

Sealiner
Staff member
Nice lure Chokka 123 - can use it even in the salt :fishn

There's BJ & LGF , Fritz & many more to give advice , & I think if u read some of the previous threads on the DIY Lure section u will most defn find Tuts on how to finish it off.

Good luck:SSS:SSS
 
Chokka

1stly, :welcomesea:
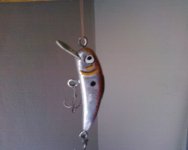
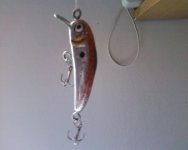
, now as far as the lure goes, here's my take on it and by no means an expert oppinion, but, i think you nailed the shape of the lure very good, it looks like it will swim with enough action on the tail.

Did you put any weight in the belly that would ensure it will swim upright?

The paintjob, it can be done to look like a bought lure, but you using spray cans, it's fine, anyhows, colours are a little more important than patterns, so if you can get colouring right (depending on the water you want to use your lure) then don't worry about patterns and finishing it so that it can pass as a mass produced factory finished lure.

You, mentioned that you still need to seal it, we normally make use of 2K automotive clear paint, but I'm not too sure if it is available in spraycans, don't think so. I would (in your case) recommend that you get yourself a can of clear laquer and bake the lure between layers in the oven on around 40-60 for around 30 minutes a time, it won't be as hard as the 2K but again (you using spray can paint) it would give you the nicest looking finish, if that's what you're after. Otherwise you could use wood sealer like Sanding Sealer etc etc.

One last thing, actually two, One, You mentioned molding rubber that you used for the 3D gill-plates and the small fin, did you apply it flat on the lure or was there a recess that makes it stick into the lure? Never heard or udes molding rubber so I'm not to sure about its adhesive properties. Two, how did you secure the bib (lip) to the lure?
 
Just one thing I noticed, the wires seems to have open ends, question is how does the wiring work, does ti go straight through the lure as one piece or did you just drill holes and inserted the wire loop into that, in which case how did you secure that?

Reason for asking is that when a fish of decent weight yanks on the hooks, and the wire inserts is just glued into a hole in the lure, chances are very good it will rip the wire out of the lure?
 

chokka 123

New member
The molding rubber sticks quite well to the wood and I used regular quick set epoxy to secure the bib to the lure. The inserts that I use is little screw eyes , I only intend to catch bass with this lure so they should be fine . I did not put any weight in so I'm basically praying it will swim upright!

I am looking to Improve my future Lures by getting a Lath as well as getting a airbrush. I think it will greatly improve my Lures. As well I would Like to attempt Trough wire and belly weights in my future lures as well.

Thanks LGF !
 
Chokka, Buddy, please check for a tutorial post that Bennie did on the through wire (think it was him, he's done many a great tutorial post) and rather (I know you don't wanna hear this, but it will only save you the frustration) redo that lure with strong enough wire, the through wire, bass can be very feisty and I am afraid those open eyes with only being screwed into the wood, well it's not going to hold a bass of more than 2kg's Buddy.

Sorry to have to be the one that tells you this, but rather that than losing the lure you've worked on and losing all the effort to a fish.......
 
Top