
okuma andros 5 II rebuild - 5/7/2011
small okuma two speeds! take two! quick check, 4 seconds of freespool.
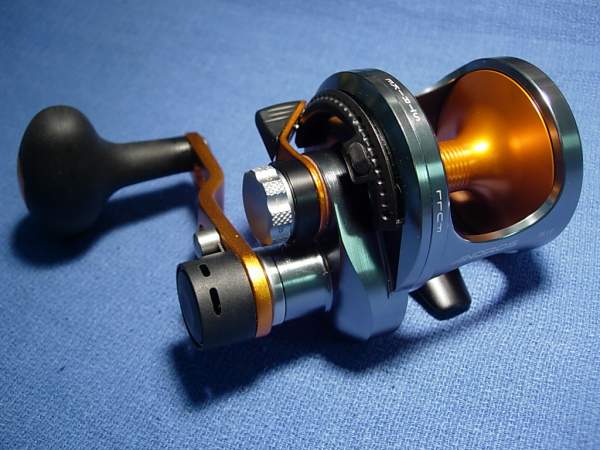
i think this is the reel that john bretza's been dragging around for the last year.

we will be using schematic #109OKM04701051, dated 10/04/2010 - http://alantani.com/index.php?topic=1802.0


no granny gear here. 3.8 to 1 on the low gear is still pretty high. this is more in line with an avet.

a clicking preset knob. a very nice, perhaps even critical, feature.

been very pleased with this shifter mechanism.

let's crack this reel open. first, unscrew and remove the drag knob assembly (key #600).

using a number 10 torx bit, remove the right side plate screw (key #930-1223).

twist the right side plate assembly (key #200) counter-clockwise and the reel separates easily into three pieces.

let's take a look at the frame assembly (key #100) first. nice coat of corrosion x hd.

let's pull the body foot (key #102). four screws (key #930-1124 and 930-1218) come out using a number 10 torx bit.


add a light coat of grease

re-install the body foot (key #102) and the four screws (key #930-1124 and 930-1218), wipe off the excess grease and set the frame assembly aside.

now for the spool assembly (key #400).

remove the spool gear (key #401) and screws (key #930-1222).
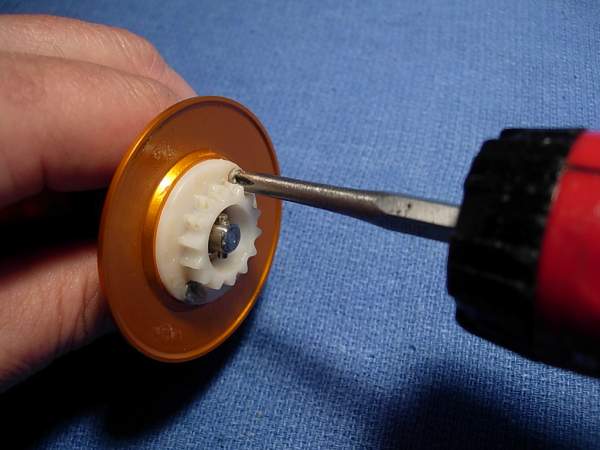
let's take a look at all the parts of the spool assembly.

here is a closer look at the main shaft assembly.

the left spool bearing (key #910-447) is a high quality japanese ezo bearing and measures 6x15x5mm. the right spool bearing (key #910-475) is 6x13x3.5mm

let's open them up, clean them out, and lube them with TSI 301.


the drag washer (key #610) is held in by a stainless steel retainer (key #608). it is already grease, so there is no need to service it, but we are going to take a look and regrease it anyway.

rebuild the left side of the main shaft (key #718).

slide the main shaft assembly into place and re-install the right spool bearing (key #910-475).

25 seconds of freespool. not bad for a feather-light spool.

the spool assembly (key #400) is done. set it aside and let's move on.

now for the handle side plate assembly (key #200).

WARNING!!! the anti-reverse pawls (key #201) are what i call "ambassaduer-style dogs." if you grab the pinion guard assembly (key #607) and just yank, you may bend the springs (tabs) on the pawls. with the blade of a tiny screwdrive or small knife, lift up the pawls and shimmy them up as you gently lift the pinion guard assembly. the thing you do not want to do is pull the pinion guard assembly forcefull, have the pawls stuck, and then bend the springs on the pawls. for the purposes of the photo, i placed the pawls back so you can see how they are oriented. this will give you an idea of where you have to lift.

remove the cover (key #912) and single screw (key #930-1178).

remove the high (key #702) and low (key #702-1) speed pinion gears as a unit.
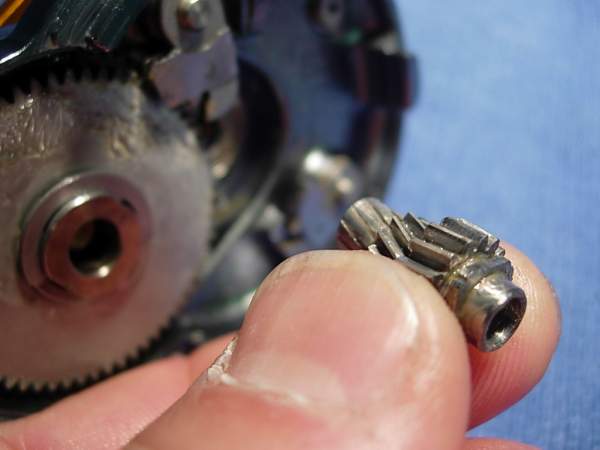
remove the two anti-reverse pawls (key #201). take a moment to make sure the "springs" of the pawl are not flared out and will still grab the anti-reverse ratchet (key #202) properly. bending the springs in a little will certainly not hurt.

ADVISORY!!! like the makaira 8, 10 and 15 two speeds, we need to service (or at least check) the right main side plate bearing (key #910-472). unlike the makaira, there are also two drive gear shaft bearings (key #910-473) that must be serviced. for the purposes of demonstration only, i am going to remove the two speed shifter mechanism, first. you will likely never have to do this to your reel. ok, here goes.
WARNING!!! remove the c-retainer using a number 2 ringed owner flyliner hook. take caution not to let the retainer fly across the room.

remove the handle nut retainer (key #516-1).

remove the two screws (key #930-1107) for the clutch shift box (key #516).

remove the clutch shift box (key #516), screws (key #930-1107), push button spring (key #508) and push button (key #507) as a unit. it will be set aside and then re-installed with this side up.

remove the handle screw (key #515).

remove the handle nut (key #501) and note that it has left-handed or reverse threads.

WARNING!!! - remove the e-retainer (key #900-0006) and take care not to let it go flying.

remove the drive gear washer (key #920-026).

remove the low speed drive gear (key #700-1) and teflon washer (key #920-412) as a unit.

remove the high speed drive gear (key #700) and note the orientation as counter-bored side up.

remove the drive gear transmission pin (key #507-1).

remove the stainless steel washer (key #920-026) followed by the white teflon bushing (key #726-1).

WARNING!!! remove the c-retainer (key #901-0006) with caution. this is a no fly zone.

remove the handle (key #500) and drive gear shaft (key#701) as a unit. you now have easy access to the right main side plate bearing (key #910-472) and the two drive shaft bearings (key #910-473).

take a moment to survey the parts.

the right main side plate bearing (key #910-472) is a high quality japanese ezo bearing and measures 6x15x5mm. we'll pack it with grease using a bearing packer. http://alantani.com/index.php?topic=50.0 this allows us to pack the bearing without having to mangle the shields.

the pair of drive gear shaft bearings (key #910-473) measure 12x18x4mm. the seals are easily remove. these bearings must be packed with grease as well. let's get this side plate back together!


re-install the right main side plate bearing (key #910-472).

re-install the two drive gear shaft bearings (key #910-473) and bushing (key #726).


re-install the handle (key #500) and drive gear shaft (key #701) assembly.

WARNING!!! re-install the c-retainer (key #901-0006) with care. this is a no fly zone.

re-install the white teflon bushing (key #726-1) and the stainless steel washer (key #920-026).

re-install the clutch shaft pin assembly (key #517) and compression spring (key #204-1) as a unit.

ADVISORY!!! re-install the drive gear transmission pin (key #507-1) through the drive gear shaft (key #701) AND the clutch shaft pin assembly (key #517).

re-install the high speed drive gear (key #700) with the counterbored side facing towards you.

re-install the low speed drive gear (key #700-1) and teflon washer (key #920-412) with the washer side away from you.

re-install the low speed drive gear washer (key#920-026).

WARNING!!! carefully re-install the e type retainer (key #900-006). this is a no fly zone.

re-install the handle nut (key #501). remember that it has left hand threads and must be oriented as shown.

re-install the handle screw (key #515).

re-install the clutch shift box (key #516) assembly upside down to avoid having the push button (key #507) fall out.

gently tighten the clutch shift box screws (key #930-1107).

re-install the handle nut retainer (key #516-1). i believe this part should be called a clutch shift button.

reinstall the c type retainer (key #901-0025). now would be a good time to verify that the side plate shifts gears properly.

ok, this is the home stretch. there is a bearing (key #910-457) inside the pinion guard (key #607) that measures 6x13x5mm. this bearing is open when it needs to be shielded. any grease that flings out may land on the drag washer, so we will have to pack it with cal's grease.


the anti-reverse ratchet (key #202) is on the flip side of the pinion guard (key #607) and hold the anti-reverse pawls (key #201).

lining up the pawls and dropping the entire assembly into the side plate can be tricky. that's what these markers are for.

line up the holes in the pawls (key #201) with the machined marks on the pinion guard (key #607).


re-install the high speed (key #702) and low speed (key #702-1) pinion gears as a unit.

it may take a couple of tries, but you should be able to shimmy it into place.

re-install the gear box cover (key #912).

re-install the cover screw (key #930-1178).

re-install the spool assembly (key #400) into the frame assembly (key #100).

re-install the handle side plate assembly (key #200).

from this first position, twist the handle side plate assembly (key #200) clockwise until it seats.


re-install the screw (key #930-1223) for the right handle plate assembly (key #200).
ADVISORY!!! re-install the drag knob assembly (key #600) with the lever drag assembly (key #605) in the "free" position. the drag knob must nest into the the lever.

and done!

well, almost done. we still need to run the reel through its paces. meet evan at the fisherman's warehouse. he's going to load this reel with 50 pound stren spectra.


gotta wind these tight!

much more than i would have expected. 400 yards of 50 pound solid spectra.

hmmmm.... i love the smell of fresh spectra in the morning....

ok, now for a little commentary. i'm betting this reel has been dragged around for a year, so maybe that's why the freespool was so poor. i should have changed out the bearings but they were perfectly smooth. when aaron did his review, he got 60 seconds of freespool. all i got was 25 seconds. not great, but perfectly adequate and definitely not a deal killer. like aaron, i got 12 pounds of drag at strike with absolutely no side load. that means you can fish a short 40 pound fluorocarbon topshot with no problem. the side load did not become noticeable until you hit 15 pounds of drag at strike. the double dogs give the anti-reverse system a huge boost in reliability, and they are not something you would normally see until you reached a reel twice it's size. basically, it's a nice little reel. it will deliver perhaps half the level of performance that the makaira 8 delivers, but will easily go toe to toe against any other reel in it's size class, and many that are larger. i'd say okuma has another winner on their hands. gentlemen, well done!
alan
written 3/7/2011
small okuma two speeds! take two! quick check, 4 seconds of freespool.
i think this is the reel that john bretza's been dragging around for the last year.
we will be using schematic #109OKM04701051, dated 10/04/2010 - http://alantani.com/index.php?topic=1802.0
no granny gear here. 3.8 to 1 on the low gear is still pretty high. this is more in line with an avet.
a clicking preset knob. a very nice, perhaps even critical, feature.
been very pleased with this shifter mechanism.
let's crack this reel open. first, unscrew and remove the drag knob assembly (key #600).
using a number 10 torx bit, remove the right side plate screw (key #930-1223).
twist the right side plate assembly (key #200) counter-clockwise and the reel separates easily into three pieces.
let's take a look at the frame assembly (key #100) first. nice coat of corrosion x hd.
let's pull the body foot (key #102). four screws (key #930-1124 and 930-1218) come out using a number 10 torx bit.
add a light coat of grease
re-install the body foot (key #102) and the four screws (key #930-1124 and 930-1218), wipe off the excess grease and set the frame assembly aside.
now for the spool assembly (key #400).
remove the spool gear (key #401) and screws (key #930-1222).
let's take a look at all the parts of the spool assembly.
here is a closer look at the main shaft assembly.
the left spool bearing (key #910-447) is a high quality japanese ezo bearing and measures 6x15x5mm. the right spool bearing (key #910-475) is 6x13x3.5mm
let's open them up, clean them out, and lube them with TSI 301.
the drag washer (key #610) is held in by a stainless steel retainer (key #608). it is already grease, so there is no need to service it, but we are going to take a look and regrease it anyway.
rebuild the left side of the main shaft (key #718).
slide the main shaft assembly into place and re-install the right spool bearing (key #910-475).
25 seconds of freespool. not bad for a feather-light spool.
the spool assembly (key #400) is done. set it aside and let's move on.
now for the handle side plate assembly (key #200).
WARNING!!! the anti-reverse pawls (key #201) are what i call "ambassaduer-style dogs." if you grab the pinion guard assembly (key #607) and just yank, you may bend the springs (tabs) on the pawls. with the blade of a tiny screwdrive or small knife, lift up the pawls and shimmy them up as you gently lift the pinion guard assembly. the thing you do not want to do is pull the pinion guard assembly forcefull, have the pawls stuck, and then bend the springs on the pawls. for the purposes of the photo, i placed the pawls back so you can see how they are oriented. this will give you an idea of where you have to lift.
remove the cover (key #912) and single screw (key #930-1178).
remove the high (key #702) and low (key #702-1) speed pinion gears as a unit.
remove the two anti-reverse pawls (key #201). take a moment to make sure the "springs" of the pawl are not flared out and will still grab the anti-reverse ratchet (key #202) properly. bending the springs in a little will certainly not hurt.
ADVISORY!!! like the makaira 8, 10 and 15 two speeds, we need to service (or at least check) the right main side plate bearing (key #910-472). unlike the makaira, there are also two drive gear shaft bearings (key #910-473) that must be serviced. for the purposes of demonstration only, i am going to remove the two speed shifter mechanism, first. you will likely never have to do this to your reel. ok, here goes.
WARNING!!! remove the c-retainer using a number 2 ringed owner flyliner hook. take caution not to let the retainer fly across the room.
remove the handle nut retainer (key #516-1).
remove the two screws (key #930-1107) for the clutch shift box (key #516).
remove the clutch shift box (key #516), screws (key #930-1107), push button spring (key #508) and push button (key #507) as a unit. it will be set aside and then re-installed with this side up.
remove the handle screw (key #515).
remove the handle nut (key #501) and note that it has left-handed or reverse threads.
WARNING!!! - remove the e-retainer (key #900-0006) and take care not to let it go flying.
remove the drive gear washer (key #920-026).
remove the low speed drive gear (key #700-1) and teflon washer (key #920-412) as a unit.
remove the high speed drive gear (key #700) and note the orientation as counter-bored side up.
remove the drive gear transmission pin (key #507-1).
remove the stainless steel washer (key #920-026) followed by the white teflon bushing (key #726-1).
WARNING!!! remove the c-retainer (key #901-0006) with caution. this is a no fly zone.
remove the handle (key #500) and drive gear shaft (key#701) as a unit. you now have easy access to the right main side plate bearing (key #910-472) and the two drive shaft bearings (key #910-473).
take a moment to survey the parts.
the right main side plate bearing (key #910-472) is a high quality japanese ezo bearing and measures 6x15x5mm. we'll pack it with grease using a bearing packer. http://alantani.com/index.php?topic=50.0 this allows us to pack the bearing without having to mangle the shields.
the pair of drive gear shaft bearings (key #910-473) measure 12x18x4mm. the seals are easily remove. these bearings must be packed with grease as well. let's get this side plate back together!
re-install the right main side plate bearing (key #910-472).
re-install the two drive gear shaft bearings (key #910-473) and bushing (key #726).
re-install the handle (key #500) and drive gear shaft (key #701) assembly.
WARNING!!! re-install the c-retainer (key #901-0006) with care. this is a no fly zone.
re-install the white teflon bushing (key #726-1) and the stainless steel washer (key #920-026).
re-install the clutch shaft pin assembly (key #517) and compression spring (key #204-1) as a unit.
ADVISORY!!! re-install the drive gear transmission pin (key #507-1) through the drive gear shaft (key #701) AND the clutch shaft pin assembly (key #517).
re-install the high speed drive gear (key #700) with the counterbored side facing towards you.
re-install the low speed drive gear (key #700-1) and teflon washer (key #920-412) with the washer side away from you.
re-install the low speed drive gear washer (key#920-026).
WARNING!!! carefully re-install the e type retainer (key #900-006). this is a no fly zone.
re-install the handle nut (key #501). remember that it has left hand threads and must be oriented as shown.
re-install the handle screw (key #515).
re-install the clutch shift box (key #516) assembly upside down to avoid having the push button (key #507) fall out.
gently tighten the clutch shift box screws (key #930-1107).
re-install the handle nut retainer (key #516-1). i believe this part should be called a clutch shift button.
reinstall the c type retainer (key #901-0025). now would be a good time to verify that the side plate shifts gears properly.
ok, this is the home stretch. there is a bearing (key #910-457) inside the pinion guard (key #607) that measures 6x13x5mm. this bearing is open when it needs to be shielded. any grease that flings out may land on the drag washer, so we will have to pack it with cal's grease.
the anti-reverse ratchet (key #202) is on the flip side of the pinion guard (key #607) and hold the anti-reverse pawls (key #201).
lining up the pawls and dropping the entire assembly into the side plate can be tricky. that's what these markers are for.
line up the holes in the pawls (key #201) with the machined marks on the pinion guard (key #607).
re-install the high speed (key #702) and low speed (key #702-1) pinion gears as a unit.
it may take a couple of tries, but you should be able to shimmy it into place.
re-install the gear box cover (key #912).
re-install the cover screw (key #930-1178).
re-install the spool assembly (key #400) into the frame assembly (key #100).
re-install the handle side plate assembly (key #200).
from this first position, twist the handle side plate assembly (key #200) clockwise until it seats.
re-install the screw (key #930-1223) for the right handle plate assembly (key #200).
ADVISORY!!! re-install the drag knob assembly (key #600) with the lever drag assembly (key #605) in the "free" position. the drag knob must nest into the the lever.
and done!
well, almost done. we still need to run the reel through its paces. meet evan at the fisherman's warehouse. he's going to load this reel with 50 pound stren spectra.
gotta wind these tight!
much more than i would have expected. 400 yards of 50 pound solid spectra.
hmmmm.... i love the smell of fresh spectra in the morning....
ok, now for a little commentary. i'm betting this reel has been dragged around for a year, so maybe that's why the freespool was so poor. i should have changed out the bearings but they were perfectly smooth. when aaron did his review, he got 60 seconds of freespool. all i got was 25 seconds. not great, but perfectly adequate and definitely not a deal killer. like aaron, i got 12 pounds of drag at strike with absolutely no side load. that means you can fish a short 40 pound fluorocarbon topshot with no problem. the side load did not become noticeable until you hit 15 pounds of drag at strike. the double dogs give the anti-reverse system a huge boost in reliability, and they are not something you would normally see until you reached a reel twice it's size. basically, it's a nice little reel. it will deliver perhaps half the level of performance that the makaira 8 delivers, but will easily go toe to toe against any other reel in it's size class, and many that are larger. i'd say okuma has another winner on their hands. gentlemen, well done!
alan
written 3/7/2011