willem wikkel spies
Moderator
Right guys this is a quick diy about how to make a slide maker and how to make your own slides.
it is how I do it. it works for me.
please feel free to comment and share your way of making them.
It is quite easy to do it and at the end of the day, much more rewarding, in catching a fish with equipment you made yourself.
Just some back ground:
I have always been a rock and surf "salt water angler" and my vision in life was to catch big fish.
no sharks, just big edible fish.
in 1996 I met the pioneer who actually invented the slide, but he never went on to produce and distribute it.
he was Jack Doonan, an Irish engineer and local angler in St Lucia. a brilliant angler I should add.
the slide was a conversion from the old clip "cuda clip"
since then I have only produced my own slides and all of my fish have been caught on my own slides.
so yes, a big reward for me over the years.
I have also made some slides for a tackle shop in Heidelberg, where I would make 100 slides and I would get 25 out of the 100 made.
the big problem was to source the correct wire.
it has been discussed several time which wire one needs to use when making your own slide.
I even tried making them from galvanised spring steel. this did work, but as salt water and galvanise don't mix it was a flop.
over time I have come to the conclusion that stainless spring steel wire was the best to use.
several anglers use tig wire 316 stain less steel.
it must be noted that the tig wire is not a spring steel wire, hence the use of beads between the bend and locking arm
the bead prevents the slide from deformation when big pressure is applied to it.
further is have found that the best wire to use for slides is 1,8mm thick.
1,6mm does work but with heavy pressure it will start to deform.
I even used 1,2mm wire and caught plenty of cob and Garrick on them.
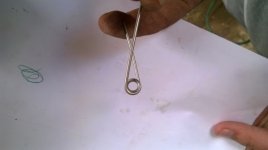
with me being able to turn plenty of slides as well as fishing with my own slides I have found that a 3-5 turn slide works best.
I am in the proses of playing more since I have achieved my goal posts in life with regards to size caught.
so now it is time, to fine tune certain aspects of my angling, cause currently I want quantity and not quality.
so the more fish I can catch now, the more rewarding I hope it will be.
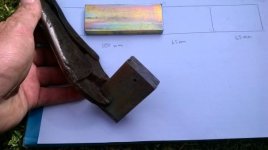
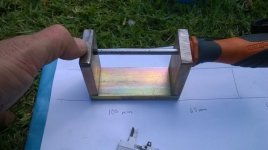
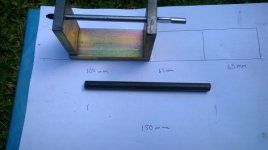
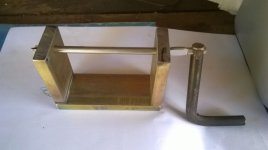
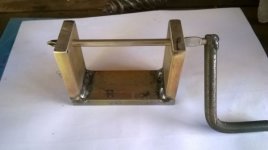
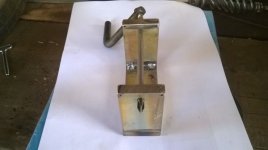
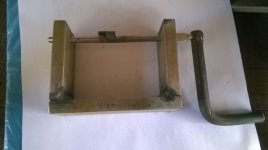
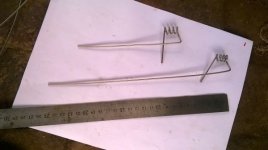
so lets get to the point: the slide maker.
it is how I do it. it works for me.
please feel free to comment and share your way of making them.
It is quite easy to do it and at the end of the day, much more rewarding, in catching a fish with equipment you made yourself.
Just some back ground:
I have always been a rock and surf "salt water angler" and my vision in life was to catch big fish.
no sharks, just big edible fish.
in 1996 I met the pioneer who actually invented the slide, but he never went on to produce and distribute it.
he was Jack Doonan, an Irish engineer and local angler in St Lucia. a brilliant angler I should add.
the slide was a conversion from the old clip "cuda clip"
since then I have only produced my own slides and all of my fish have been caught on my own slides.
so yes, a big reward for me over the years.
I have also made some slides for a tackle shop in Heidelberg, where I would make 100 slides and I would get 25 out of the 100 made.
the big problem was to source the correct wire.
it has been discussed several time which wire one needs to use when making your own slide.
I even tried making them from galvanised spring steel. this did work, but as salt water and galvanise don't mix it was a flop.
over time I have come to the conclusion that stainless spring steel wire was the best to use.
several anglers use tig wire 316 stain less steel.
it must be noted that the tig wire is not a spring steel wire, hence the use of beads between the bend and locking arm
the bead prevents the slide from deformation when big pressure is applied to it.
further is have found that the best wire to use for slides is 1,8mm thick.
1,6mm does work but with heavy pressure it will start to deform.
I even used 1,2mm wire and caught plenty of cob and Garrick on them.
with me being able to turn plenty of slides as well as fishing with my own slides I have found that a 3-5 turn slide works best.
I am in the proses of playing more since I have achieved my goal posts in life with regards to size caught.
so now it is time, to fine tune certain aspects of my angling, cause currently I want quantity and not quality.
so the more fish I can catch now, the more rewarding I hope it will be.
so lets get to the point: the slide maker.